
It’s been quiet here recently as we’re still mostly working on getting our fruity Apple & Pear Houses ready over at Rock & Pebble, but I see them all coming together nicely and they might even be ready to ship in less than a couple of weeks now. To celebrate, we’re going all tutti frutti this week! Ok, skip the promo (blush!) and now on to the pompoms. If you’re feeling a bit deficient in vitamin C after a long winter like us, this is where we’ll top up our extra fruit portions! They make great play foods that are soft to hold and colorful to the eye. Some designs are very easy to make, so hope you have a go!

Out of these fruit pompoms, I’ve managed step-by-step tutorial pics for the strawberry, kiwi, lemon and watermelon with some diagrams and trimming tips. Sorry for not including tuts for everything but I think this post is going to be a very long one ……
The strawberry pompom is probably the easiest one so you can make a few in no time and kids will love a handful of them. Ok let’s start!
As you can see, I’m still using the cardboard pompom maker I made for the previous pompoms and it’s now looking decidedly shabby in the photos. I’m getting one made in wood at the moment and it’s going to be great. Watch this space if you’re curious! ; )

As usual, I’m skipping the repeating basic steps like putting two halves of the pompom maker together, cutting and tying. When I say ‘finish your pom-poms’ I mean complete these steps. For details, please see this how to make flower pompoms post.
How to make Strawberry Pompoms

1. Wrap red yarn as a base for the pompom but add a few wraps of white yarn scattered here and there as in the photo to create seeds. Repeat this in random places as you go and build layers.
2. Add a small bunch of green yarn on one end loosely. Make the other half of your pompom in the same way and bring them together so the green parts meet at the same end.
4. For trimming, hold all the green yarn on top together and trim the red part only into a neat ball at first. Now trim the bottom end into a pointy shape to resemble a strawberry.
5. Now flatten the top green yarn and trim some yarns shorter than others, into a star-like shape. You can trim them much shorter if you like, I just like that leafy top of the strawberry so I tried to give some feature there. Keep a few yarns long in the middle as a stem. Yum!


How to make Kiwi Pompoms

I’ve made little diagrams on the top left corners of each image that show the part I’m wrapping in each photo next to it. Hope that helps!
1. Wrap a couple of layers of white yarn covering about 1/3 of the pompom maker in the middle area.
2. Hold a mix of white and black yarn together and wrap on the top for the seeds.
3. Wrap green yarn all over on the top and sides of the seeds, but not all the way to the very edges of the pompom maker. Leave some room on both sides. See the image above.
4. Wrap the brown yarn all over for the outer skin color. This time, cover the entire area of the pompom maker from edge to edge. This is now one half of your kiwi pompom.
5. For the second half, wrap entirely in brown skin color only. Put the two halves together and finish.

When you cut it open, you will have a green kiwi design in the middle surrounded by the brown outer color. Trim the green inner fruit part to make a flat top. To do this place your scissors horizontally on top of it as in the photo above and snip off the fluffy top. Be careful not to trim too close to the yarn that’s tying the whole pompom in the middle. The reason why we wrap extra brown yarn on top of the green in the first half of the pompom is to keep the center of the pompom away from the green part so this doesn’t happen, but it’s still worth checking that you’re not cutting too close to the center as you trim.
Once you’ve trimmed the top quite flat, trim the edges of the green circle to tidy up. Then snip off all the brown yarn sticking out next to the green like the photo above. Trim the rest of the brown yarn on the other side to make a longish kiwi like shape. Done!


How to make a Watermelon Pom Pom
I ended up with a massive pompom for this. I’ve been using a one-size-fits-all cardboard pompom maker for every pompom so far. If I want to make larger pompoms, I try to wrap more yarn. Or conversely wrap less yarn to make smaller pompoms. If you’re interested in tips for making different sized pompoms, I’ll try new methods next time and report the difference.

Ok, so for the watermelon pompom:
1. For the first pompom half, wrap pink yarn and scatter a little wrap of black yarn in random places as you go. Just like the strawberry above. Finish the entire first half of the pompom like this.
2. Now for the second half, start by wrapping a mixture of two green yarns – light and dark – next to each other, to create green stripes on the outer skin. You can cover 3/4 of the pompom maker with this (that’s what I did, see above) or the entire length if you’d like to make a larger green skin area.
3. Wrap a thin layer of white yarn on top of the green.
4. On top of this white layer, wrap the pink color you used in the first pompom half, either with or without the seed parts.
5. So one half of the pompom is entirely pink, the other half is made up of the layers of green, white and pink. As you see in the photo above, finished in pink on top. Put the two halves together and finish.
6. Now it will look like the last image above. Trim it as you like, into a round ball or a wedge with a pointy end as I did. Juicy!

Melon & Lemon Pear well together! ^ ^
How to Make a Lemon Pom Pom
Again, I added tiny diagrams in the top left corners to show which part is wrapped. Hope this helps!
1. Wrap a thin layer of white first, but not all the way from end to end. As you can see in the diagram and photo, you need to leave some room at both ends.
2. Wrap some yellow yarn like in the picture top right. Fatter on both ends and thinner towards the middle with a gap in the center.

3. Wrap another thin layer of white on top. As you can see, the shape’s narrower in the middle like an hour-glass.
4. Wrap more yellow yarn on top, filling up the narrow middle area.
5. Again, wrap a thin layer of white on top.
6. Now wrap a decent amount of yellow all over. This is your first half of the lemon pompom.
7. For the second half, simply wrap solid yellow color only.

Ta-da! When you open, you will get this yellow rough ball with some white lines going across. As with the kiwi, trim the top side with white lines flat. Keep your scissors flat to the surface and keep trimming.
Gather the edges towards the middle in your hand and trim the white circle edges neatly. Once you’re happy with the flat top, trim the rest of the yellow body into a neater lemon shape.

I wanted to make a big big pineapple so I made it from 2 pompoms. You can see that the bottom half shares the lemon techniques and the top is a bit like the strawberry with leaves.

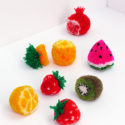
I was planning to start by making apple & pear pompoms but somehow didn’t make an apple, got too carried away with tropical fruits. It was going to be a pom pomme. (Leyla’s brother’s suggestion. ^ ^ ) Instead I made a pom pomegranate this time. Now enjoy your Crazy Big Fluffy Fruit Salad!
Ps. I know it would be useful to have some more tips and videos but right now I just don’t have the time, too many projects planned! I try to include as much as I can in each post. If you love pom poms I have many more planned (with more tips!) so please pop in again. Thanks!


Pom pomme cracked me up! ^^ These are amazing, love the pomegranate so much. Great job! (Seriously need to invest in some yarn now)
Go get some yarn and join the pompom club!! ; )
I need to make a Pom Pomodoro too!
watermelon !!!!!awesome ! thanks 🙂
Just had to do a watermelon! ^ ^
You are genius. Period. These are amazing! I’ll have a go as my two years old son is obssesed with fruits 🙂 xx
Thanks Jessica. ^ ^ Hope your son will love some fluffy fruit!
Can u pls tell me how to tie the two pieces of strawberry together befor cutting.
the pomegranate is genius
Thanks Cintia! I was happy with how it came out ^ ^
Thank you for sharing these with us, you seem busy so it’s appreciated that you even take this much time to explain the process – even if some of us, myself included, would like more and more tips! But it is only because you have us hooked on wonderful pom poms!
I’m trying to figure out how to make my own designs for poms, and to make my final product as lovely as yours, but I imagine practice will be best for that.
Thanks Beth! I’ll share more tips, let’s keep making pompoms! Feel free to share your pompoms here if you like. : )
What a funny and cool project. Thanks for sharing 🙂
Sabine
Thanks Sabine! ^ ^
awesome 🙂
I loved the strawberry pom pom, but can you please just tell me how to trim the yarn off the cardboard? I don’t seem to get it..
Hi Sarah, sorry I skip those steps now because they’re well covered in a previous post, you can see it here: making-flower-pom-poms-diy-pom-pom-maker
Can’t wait to try! Thank you so much!
Best wishes from Italy!
You are so unbelievably crafty – these are AMAZING!
Wow these things are so cute! I’ve never made a pompom anything before so the step-by-step’s are a little tough for me to understand… Is there anyway you could make a video? ^_^
Hi April, if you’ve never made a pompom before, this post is a good place to start. It shows more steps! : ) https://blog.mrprintables.com/making-flower-pom-poms-diy-pom-pom-maker/
Ohmygosh these are the cutest! Can’t get over how adorably fluffy they look! The watermelon is my favorite!
The watermelon is my favourite too
These are just all sorts of amazing! Way to go!
These are just so awesome! I need to try out some of your amazing pompom work! Thanks for sharing how to make these! 🙂 Lisa
These are brilliant! Thank you so much for sharing! Cheers, Simone
Cute!! Thanks for sharing : )
Thanks! Practise makes perfect, I hope. 😉
Wow
These are the best thing I’ve seen on Pinterest all week! They are absolutely fantastic!!!
I love these pompom tutorials. I made a car the otherday, it didn’t came out that well but it was a lot of fun to make
Oh my gosh. These are freakin’ unbelievable!!!!!!!!
Melanie @UnraveledThreads
ЭТО ПРЕЛЕСТНО
I love the watermelon and kiwi, going to try this out asap!
Hi! May i know the direction number 3 for strawberry please 🙂
Step 3 on how to bind the two strawberries is missing. I’m not sure how to do it.
these are is incredible!!! <3 <3 <3
Wow! So wonderful! Thanks for sharing the how-to!
I love it !
hello! this is brilliant and totally cute! i want to try to make the strawberry.. but i don’t know about the cardboard shape and after you wrap the yarn, where the cardboard go? do we release the cardboard? sorry, i never know about how to make pom pom before. thanks for the help! 🙂
See the flower pompom tutorial , thanks! : https://blog.mrprintables.com/making-flower-pom-poms-diy-pom-pom-maker
Wow!
Thanks so much! We made a bunch of strawberries and they are so cute. The kids had a blast. Now they are asking for the pomegranate instructions. Are they available? Thanks again!!
I’m sorry, but what’s holding them together? I understand everything except removing it and keeping it together-help someone?
Hi Sophia, all the steps are explained in this post : ) : https://blog.mrprintables.com/making-flower-pom-poms-diy-pom-pom-maker/
Wow! These are adorable!
love ittt!!! thank you so much
So cute! : ) Thanks for sharing!!
im having hard time shaping them , plss tell me any technique? thank you
hi it is me Zoe could you give us more detail on how you cut the strings without it falling apart? A few more pictures of the other steps would be great. Thanks. we are doing it in art and we want to do it
mooi
Perfect!
These are amazing! They would be so cute as a key chain! Will have to get some yarn and make one when I get the chance. Thanks for sharing!
so…. how do you actually make the pineapple?…… (btw these are really cool!!!)
They are amazing!!!! Thank you helped me!!!!!
🙂 🙂 🙂 🙂
Really nice pom-pom fruit.
like it !
My watermelon has not come out well! I’m not sure if I’ve cut it of the cardboard wrong. Any advice?
*off
??thank U!! ?